# How to Set Up a Complete Snack Packaging Line from Scratch
Setting up a snack packaging line from scratch is one of the most consequential projects a small snack manufacturer will undertake. The decisions you make at the design stage affect your production capacity for the next 10–15 years, your labor requirements, your product quality, and your ability to scale as the business grows.
The good news is that a snack packaging line is also one of the most well-understood applications in food manufacturing. The equipment configurations are proven, the integration patterns are standardized, and the common pitfalls are well-documented. By following a structured approach and learning from those who have gone before, you can avoid the most expensive mistakes and get into production quickly.
This guide walks through the entire process — from initial planning through commissioning and ramp-up — with practical advice for small snack manufacturers setting up their first (or next) packaging line.
## Table of Contents
1. [What "Complete Snack Packaging Line" Actually Means](#section1)
2. [Phase 1: Define Your Product and Volume Requirements](#section2)
3. [Phase 2: Map Out the Process Flow](#section3)
4. [Phase 3: Select Equipment for Each Station](#section4)
5. [Phase 4: Design the Facility Layout](#section5)
6. [Phase 5: Plan Electrical, Air, and Utility Requirements](#section6)
7. [Phase 6: Build a Realistic Budget](#section7)
8. [Phase 7: Installation, Commissioning, and Ramp-Up](#section8)
9. [Common Mistakes and How to Avoid Them](#section9)
10. [Conclusion](#conclusion)
---
## 1. What "Complete Snack Packaging Line" Actually Means {#section1}
A complete snack packaging line is more than just a packaging machine. It's an integrated sequence of equipment that takes bulk product from upstream processing and delivers finished, cased, palletized product ready for shipment to distribution centers or retailers.
For most snack applications, the line consists of the following stations:
1. **Product feeding** — Metal detection, magnetic separation, and surge hoppers that condition the product for accurate weighing
2. **Weighing** — Multi-head weighers or linear weighers that portion the product to the target weight
3. **Bag-making and filling** — VFFS machines that form the bag, receive the weighed product, and seal it
4. **Quality control** — Checkweighers and vision systems that verify weight and label accuracy
5. **Coding and labeling** — Date coders, lot code printers, and label applicators
6. **Case packing** — Equipment that places finished bags into shipping cases
7. **Case sealing and palletizing** — Tape sealers, case erectors, and palletizers
8. **End-of-line** — Stretch wrappers, conveyor systems, and pallet handling
The complexity can range from a simple 3–4 station line (weighing, bagging, checkweighing, case packing) to a 10+ station fully integrated line with robotic palletizing and automated warehousing. Most small snack manufacturers start with the simpler configuration and add stations as volume grows.
The [SPS snack packaging solutions](/solutions/snacks/) cover several typical configurations for small to mid-sized snack manufacturers, with equipment specifications and layout guidance for each.
---
## 2. Phase 1: Define Your Product and Volume Requirements {#section2}
Before evaluating any equipment, you need clear answers to these foundational questions:
**Product characteristics:** What are you packaging? Different snack categories — chips, popcorn, pretzels, nuts, candy, granola, dried fruit — have different handling requirements. A tortilla chip line handles fragile, irregularly shaped products gently. A candy line handles high-density, often sticky products. A nut line may need to handle oil residues. The product characteristics drive the equipment selection at every station.
**Package format:** What package style will you use? The most common formats for snack products are:
- Pillow bag (VFFS with simple forming collar) — most economical, good for chips, popcorn, basic snacks
- Gusseted bag (VFFS with gusset forming) — better shelf presence, more material cost
- Stand-up pouch (pre-made or VFFS) — premium format, requires specialized equipment
- Quad-seal bag (VFFS with quad forming) — premium, used for nuts, candy, coffee
- Flow-wrap (HFFS) — used for candy bars, granola bars, individually wrapped items
The package format drives the VFFS machine configuration. Most small manufacturers start with pillow bags and add other formats as their product line expands.
**Package sizes:** What sizes will you run? A 1-oz pillow bag and a 12-oz pillow bag require different forming collars, different bag lengths, and different filling weights. A line designed for one size will struggle to run another efficiently. If you plan to run multiple sizes, choose equipment with quick-changeover capability and budget for additional forming collars.
**Production volume:** What's your target production rate? This question is more nuanced than it first appears. The right number isn't your current volume — it's your projected volume 18–24 months from now. Equipment that meets today's needs will be undersized in 18 months, and the cost of upgrading is high. Buy equipment that can handle 1.5–2x your current target volume.
**Product changeover frequency:** How many SKUs will you run, and how often will you switch between them? A line that runs 3 SKUs with monthly changeovers has very different requirements than a line that runs 20 SKUs with daily changeovers. The changeover frequency drives the equipment selection toward quick-changeover systems and may justify additional investment in tooling.
---
## 3. Phase 2: Map Out the Process Flow {#section3}
Once you have the foundational requirements defined, the next step is to map out the process flow. The process flow shows how product moves through the line, what happens at each station, and what equipment is needed.
A typical snack packaging process flow looks like this:
1. **Bulk product arrives** from upstream processing (frying, seasoning, cooling, etc.) in totes, bins, or a conveying system
2. **Metal detection** — Product passes through a metal detector to identify any ferrous, non-ferrous, or stainless steel contaminants. Rejected product is automatically diverted.
3. **Surge hopper / feed system** — A surge hopper holds 5–30 minutes of product to buffer the flow between the upstream process and the packaging line. Vibratory feeders or conveyors move product to the weigher.
4. **Multi-head weigher** — The weigher portions product to the target weight, typically within ±0.5–1.5 grams. The number of weigh heads and bucket configuration depends on the product and target rate.
5. **VFFS machine** — The VFFS machine forms a bag from flat packaging film, opens the bottom seal, receives the product drop from the weigher, and seals the top of the bag.
6. **Bag checkweighing** — A checkweigher verifies the final bag weight, rejecting underweight and overweight bags. Rejected bags are diverted for inspection or repackaging.
7. **Bag coding and labeling** — Date codes, lot codes, and product labels are applied. This may be done on the VFFS machine or as a separate station.
8. **Bag accumulation** — An accumulation conveyor buffers bags between the VFFS and the case packer.
9. **Case packing** — Bags are loaded into shipping cases. For small operations, this is often manual; for high-volume lines, automatic case packers are used.
10. **Case sealing and labeling** — Cases are sealed with tape, and shipping labels are applied.
11. **Palletizing** — Filled cases are stacked onto pallets. Manual for small operations, robotic for high-volume.
12. **Stretch wrapping** — Palletized product is wrapped in stretch film for transport.
The specific flow for your operation will vary based on your products, volumes, and automation level. The key is to map out every step explicitly so that no station is missed during the equipment selection phase.
---
## 4. Phase 3: Select Equipment for Each Station {#section4}
With the process flow defined, the next step is to select equipment for each station. For small snack manufacturers setting up their first line, the equipment selection typically follows a proven pattern.
**Multi-head weigher:** A [10-head or 14-head multi-head weigher](/food-packaging-machines/multihead-weighers/multi-head-weigher-vffs-system/) is the standard for most snack applications. Choose the number of heads based on your speed requirements. 10 heads are sufficient for 30–60 bags per minute. 14 heads are appropriate for 60–100 bags per minute. Choose bucket configuration based on your specific product (gentle handling for fragile products, larger buckets for irregular products, etc.).
**VFFS machine:** The VFFS machine is the centerpiece of the line. For most small snack manufacturers, a servo-driven VFFS running 30–60 bags per minute is the right starting point. Look for:
- Servo-driven film pulling (more accurate than mechanical)
- Tool-free changeover (reduces downtime between product runs)
- Stainless steel construction in product contact zones
- Color touchscreen interface
- Compatibility with your film format and sizes
[Automatic FFS packaging machines](/food-packaging-machines/ffs-machines/automatic-ffs-packaging-machine/) and [vertical form fill seal machines](/food-packaging-machines/vffs-machines/vertical-form-fill-seal-machine/) are common configurations. Choose the one that best matches your product and target throughput.
**Checkweigher:** A checkweigher is essential for compliance with FDA net weight regulations and for protecting your giveaway. Choose a checkweigher rated for your speed and accuracy requirements. Most small snack lines use a checkweigher rated for 100–200 packages per minute, with accuracy of ±0.5 grams or better.
**Metal detector:** A metal detector is required for most snack products, both for food safety and for retailer compliance. Choose a metal detector with ferrous, non-ferrous, and stainless steel detection capability. For most snack applications, a conveyor-mounted metal detector with automatic reject is the standard configuration.
**Date coder / label applicator:** Date coding is typically done on the VFFS machine using a hot stamp coder, inkjet printer, or thermal transfer printer. For products requiring variable information (lot codes, best-by dates), the printer should integrate with the line's control system. [Automatic labeling machines](/labeling-machines/) are used when the product has a separate product label in addition to the film-printed information.
**Case packer:** For small operations producing under 10,000 bags per day, manual case packing is often the most cost-effective option. A single operator can pack 5–8 cases per hour (each holding 12–24 bags), which is sufficient for many small snack manufacturers. As volumes grow, automatic case packers become economically attractive. Semi-automatic case erectors with manual product loading and automatic case taping are a good middle ground.
**Palletizer:** Manual palletizing is the starting point for most small operations. Robotic palletizers make sense at higher volumes (typically 30,000+ bags per day) where the labor savings justify the $150,000–$300,000 capital investment.
---
## 5. Phase 4: Design the Facility Layout {#section5}
The facility layout determines how efficiently product flows through the line, how much floor space the equipment occupies, and how easily operators can access the equipment for operation and maintenance.
A well-designed snack packaging line has these characteristics:
**Linear flow:** Product moves in a straight line from upstream processing through packaging to palletizing. U-shaped or L-shaped layouts are sometimes necessary due to facility constraints, but linear flow is preferred for clarity and future expansion.
**Adequate clearance:** Allow at least 36 inches of clearance on operator sides of equipment and 24 inches on non-operator sides. More clearance is better for maintenance access, but space is usually constrained.
**Separate zones for different activities:** Ideally, you have:
- A product conditioning zone (cooling, seasoning)
- A packaging zone (VFFS, labeling, checkweighing)
- A case packing and palletizing zone
- A staging zone for finished pallets
**Logical equipment grouping:** The weigher and VFFS machine should be physically integrated (with a support structure that holds the weigher above the VFFS forming tube). The checkweigher, metal detector, and label applicator should be on a single conveyor section downstream of the VFFS. The case packer and palletizer should be in a separate area with adequate space for case storage and pallet movement.
**Forklift and pallet jack access:** The palletizing area must accommodate forklifts or electric pallet jacks for moving finished pallets to storage or shipping. The path from the palletizer to the staging area should be wide enough for the equipment you'll use.
**Future expansion space:** Plan for at least 20–30% more space than you need today. The most common layout mistake is cramming equipment into too little space, leaving no room to add stations or expand capacity later.
A typical small snack packaging line occupies 800–1,500 square feet, including operator work areas, case storage, and pallet staging. A more automated line with robotic palletizing may require 1,500–2,500 square feet.
---
## 6. Phase 5: Plan Electrical, Air, and Utility Requirements {#section6}
Packaging equipment has specific utility requirements that must be planned for during the facility design phase. Missing a utility requirement can result in installation delays, additional costs, or even equipment that doesn't run properly in your facility.
**Electrical requirements** vary by equipment type:
- Small VFFS machines and labelers: 220V single-phase power
- Mid-range VFFS machines: 220V or 380V three-phase power
- High-speed VFFS lines, multi-head weighers, checkweighers: 380V or 480V three-phase power
- Conveyor systems: Typically 220V three-phase power
Verify the voltage and phase requirements of every piece of equipment before finalizing your electrical service. If your facility only has single-phase power and your equipment requires three-phase, you'll need to either upgrade your electrical service (potentially $5,000–$20,000) or select equipment that runs on single-phase.
**Compressed air requirements:**
- Most packaging equipment uses pneumatic actuators for sealing, cutting, and product handling
- Typical requirements: 0.5–0.8 MPa (70–115 PSI) at 50–200 liters per minute
- Verify your facility's compressor capacity can meet the total CFM requirement of all equipment running simultaneously
- Air quality matters: use a refrigerated air dryer and particulate filters to prevent moisture and oil contamination
**Other utility requirements:**
- Drainage for cleaning water: Floor drains or trench drains near the equipment for wash-down cleaning
- HVAC: Climate control to prevent condensation on cold product and to keep operators comfortable
- Lighting: Adequate lighting at all operator stations and inspection points
- Network connectivity: For equipment that supports IoT data collection, OEE tracking, or remote diagnostics
---
## 7. Phase 6: Build a Realistic Budget {#section7}
A complete snack packaging line is a significant capital investment. Building a realistic budget upfront prevents surprises during the procurement process.
**Equipment costs (for a typical small snack line producing 30–60 bags per minute):**
- Multi-head weigher: $25,000–$60,000
- VFFS machine: $30,000–$80,000
- Weigher-VFFS integration hardware: $5,000–$15,000
- Checkweigher: $15,000–$30,000
- Metal detector: $8,000–$20,000
- Date coder / label applicator: $5,000–$25,000
- Conveyors and integration: $10,000–$30,000
- Case packer (manual setup): $3,000–$10,000
- Case sealer: $2,000–$8,000
- **Equipment subtotal: $103,000–$278,000**
**Other capital costs:**
- Facility modifications (electrical, compressed air, drainage): $10,000–$50,000
- Installation labor: $10,000–$30,000
- Initial spare parts: $5,000–$15,000
- Operator training: $2,000–$5,000
- Initial packaging film inventory: $5,000–$20,000
- Working capital for ramp-up period: $20,000–$50,000
- **Other capital subtotal: $52,000–$170,000**
**Total project cost: $155,000–$448,000**
A typical small snack line producing 30–60 bags per minute with reasonable quality equipment lands in the $200,000–$350,000 range. Lower-cost options (used or refurbished equipment) can bring the cost down to $100,000–$180,000. Higher-end lines with more automation can exceed $500,000.
Don't forget the ongoing costs: packaging film ($0.01–$0.05 per bag depending on size and material), maintenance (5–8% of equipment cost annually), operator labor, and utilities. These costs determine the unit economics of your packaged product.
---
## 8. Phase 7: Installation, Commissioning, and Ramp-Up {#section8}
The final phase is the actual installation, commissioning, and ramp-up of the line. This phase typically takes 4–12 weeks depending on the line complexity and the readiness of the facility.
**Facility readiness (1–4 weeks before equipment arrival):**
- All utility connections installed and tested
- Floor markings for equipment positions completed
- Lighting and HVAC operational
- Network connectivity in place
- Initial spare parts delivered and organized
- Maintenance tools and supplies on hand
**Equipment delivery and installation (1–3 weeks):**
- Equipment delivered to the site
- Mechanical installation (positioning, leveling, anchoring)
- Electrical connections
- Compressed air connections
- Conveyor integration
- Initial inspection of all equipment
**Commissioning (1–2 weeks):**
- Power-on and initial testing
- Individual equipment calibration
- Line integration testing (weigher-VFFS-conveyor-checkweigher)
- Film material testing
- Product testing
- Speed optimization
- Quality verification
**Operator training (1–2 weeks, often concurrent with commissioning):**
- Basic operation of each piece of equipment
- Changeover procedures
- Basic maintenance and troubleshooting
- Quality control procedures
- Safety procedures
**Production ramp-up (2–6 weeks):**
- Start with low target rates (50% of design capacity)
- Gradually increase as operators gain experience
- Document all issues and adjustments
- Finalize SOPs based on actual operating experience
- Achieve design capacity
**Common ramp-up problems:**
- Film material issues (sealing problems, film breaking, registration issues) — usually resolved within the first week
- Weigher accuracy issues (product sticking, misfeeding) — usually resolved within the first 2 weeks
- Changeover time longer than expected — improves with operator experience over 1–3 months
- Minor electrical or pneumatic issues — resolved during commissioning
The most important success factor in ramp-up is having an experienced equipment supplier on-site for the commissioning period. Most equipment suppliers include 2–5 days of on-site commissioning in the equipment price, which is rarely enough for a complete line. Budget for additional days of supplier support during the ramp-up period. The cost ($2,000–$5,000 per day) is well worth it compared to the cost of extended production issues.
---
## 9. Common Mistakes and How to Avoid Them {#section9}
After helping many small snack manufacturers set up their first packaging lines, certain mistakes come up again and again. Here are the most common and how to avoid them:
**Mistake 1: Undersizing the line for future growth.** The cost difference between a line that does 60 bags per minute and one that does 100 bags per minute is often 20–30%. The cost of replacing an undersized line is 100%. Always buy for your 18–24 month projected volume, not your current volume.
**Mistake 2: Choosing equipment based on price alone.** The cheapest equipment rarely delivers the lowest total cost. Lower-quality equipment has higher maintenance costs, more downtime, and shorter useful life. Focus on the total cost of ownership, not the purchase price.
**Mistake 3: Forgetting about changeover time.** A line that takes 4 hours to change between products is a line that gets used for only one product. If you plan to run multiple SKUs, prioritize equipment with quick changeover capability.
**Mistake 4: Insufficient facility preparation.** Equipment arriving at a facility that doesn't have the right electrical, air, or drainage is a costly delay. Complete all facility work before equipment delivery.
**Mistake 5: Inadequate operator training.** Operators who don't fully understand the equipment will struggle to achieve design capacity, and they'll make mistakes that lead to quality issues. Invest in thorough training during commissioning and ongoing reinforcement.
**Mistake 6: No plan for film material sourcing.** The film is a critical component of your packaging, and it must be specified correctly for your equipment. Develop relationships with film suppliers early in the process and have film ready for commissioning.
**Mistake 7: Skipping the line integration design.** Equipment that works perfectly in isolation can fail when integrated with the rest of the line. Specify the integration carefully, ideally with support from a single supplier who understands the whole line.
---
---
### Recommended Equipment
 ---
### Recommended Equipment
---
### Recommended Equipment
 ## Conclusion {#conclusion}
Setting up a complete snack packaging line from scratch is a significant undertaking, but it's also a well-understood one. By following a structured process — defining requirements, mapping the flow, selecting equipment, designing the facility, planning utilities, building the budget, and managing the installation carefully — you can bring a high-performing line into production efficiently.
The most important decisions happen early: the product and volume requirements, the package format, and the overall automation level. These decisions cascade through the rest of the project. Take the time to get them right.
The manufacturers who plan thoroughly and execute carefully end up with packaging lines that serve them well for 10–15+ years. The manufacturers who rush the process end up with lines that need replacement or major upgrades much sooner. The difference is almost always in the planning phase.
**Ready to start planning your snack packaging line?** SPS can help you evaluate equipment options, design the line configuration, and estimate the total project cost. [Request a quote](/request-quote/) and our team will discuss your specific requirements and provide detailed recommendations.
---
## Related Products
- [Snack Packaging Solutions](/solutions/snacks/) — Complete configurations designed for snack manufacturers
- [Multi-Head Weigher + VFFS System](/food-packaging-machines/multihead-weighers/multi-head-weigher-vffs-system/) — The core of most snack packaging lines
- [Custom Snack Packaging Line](/production-lines/custom-solutions/custom-snack-packaging-line/) — Tailored line configurations for specific requirements
## Conclusion {#conclusion}
Setting up a complete snack packaging line from scratch is a significant undertaking, but it's also a well-understood one. By following a structured process — defining requirements, mapping the flow, selecting equipment, designing the facility, planning utilities, building the budget, and managing the installation carefully — you can bring a high-performing line into production efficiently.
The most important decisions happen early: the product and volume requirements, the package format, and the overall automation level. These decisions cascade through the rest of the project. Take the time to get them right.
The manufacturers who plan thoroughly and execute carefully end up with packaging lines that serve them well for 10–15+ years. The manufacturers who rush the process end up with lines that need replacement or major upgrades much sooner. The difference is almost always in the planning phase.
**Ready to start planning your snack packaging line?** SPS can help you evaluate equipment options, design the line configuration, and estimate the total project cost. [Request a quote](/request-quote/) and our team will discuss your specific requirements and provide detailed recommendations.
---
## Related Products
- [Snack Packaging Solutions](/solutions/snacks/) — Complete configurations designed for snack manufacturers
- [Multi-Head Weigher + VFFS System](/food-packaging-machines/multihead-weighers/multi-head-weigher-vffs-system/) — The core of most snack packaging lines
- [Custom Snack Packaging Line](/production-lines/custom-solutions/custom-snack-packaging-line/) — Tailored line configurations for specific requirements
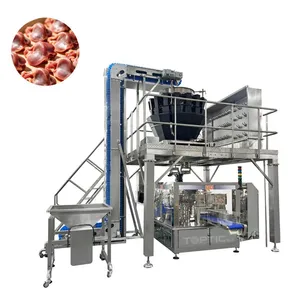
Multi-Head Weigher + VFFS System
Multi-head weigher + VFFS — the backbone of any snack packaging line.
View Details →
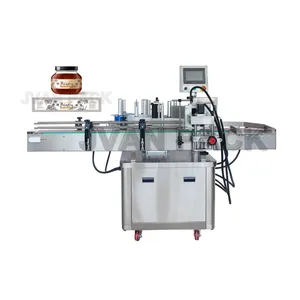
High-Speed Production Line Labeler
High-speed production line labeler — keeps pace with output of 60+ bags/min.
View Details →Need Packaging Equipment?
SPS helps small food manufacturers source reliable packaging equipment at factory prices.
Get a Free Quote →